Computer Vision: Face Detection Using OpenCV Haar Cascade Classifier


OpenCV (Open Source Computer Vision Library) is an open-source computer vision and machine learning software library. OpenCV was built to provide a common infrastructure for computer vision applications and to accelerate the use of machine perception in commercial products.
The library has more than 2500 optimized algorithms, which includes a comprehensive set of both classic and state-of-the-art computer vision and machine learning algorithms. These algorithms can be used to detect and recognize faces, identify objects, classify human actions in videos, track camera movements, track moving objects, and much more.
In this OpenCV tutorial, you will learn how to use OpenCV & Python for object detection and face recognition.
1. How to Set-up OpenCV in Anaconda.
Anaconda is a free and open-source distribution of the Python & R programming languages that aims to simplify package management and deployment for scientific purposes. Anaconda is the easiest and fastest way to do data science and machine learning on Linux, Windows, and Mac OS X.
To get started setting-up Anaconda on your machine, head over to the Anaconda download page to download the latest version of Anaconda. Anaconda installs a few programs on your computer when you run the installer. These include the Anaconda Navigator, Anaconda Cloud, Jupyter Notebook, Spyder, and the Anaconda Prompt.
Open up Anaconda Navigator, go to the “Environments Tab” as shown in the below image. Search for OpenCV library and click apply to install. OpenCV and all required dependencies will be installed.

2. Face detection using Haar Cascade method.
Face detection is a computer technology that determines the locations and sizes of human faces in images. It detects facial features and ignores anything else, such as buildings, trees, and bodies.
Face Detection using Haar feature-based cascade classifiers is an effective object detection method proposed by Paul Viola and Michael Jones. It is a machine learning-based approach where a cascade function is trained from a lot of positive and negative images. It is then used to detect objects in other images.
Our goal for this exercise is to be able to detect the faces in an image. OpenCV comes with many pre-trained classifiers for face, eyes, smiles, etc. Those classifiers are stored in an XML file format and can be found in the “opencv/data/haarcascades/” folder or click here to download.
Step 1: Import required Python modules.
First, we need to load the required Python modules into our work environment. To ensure that opencv module is loaded correctly, its version was printed below.
## opencv python modules
import cv2
from matplotlib import pyplot as plt

print ("Version of OpenCV: {}".format(cv2.__version__))
Step 2: Load and display image of faces to be used.
For this exercise, we will be using a sample image of different faces. We will load this image into our work environment using the opencv “imread” function. Once the image has been loaded, we will use Matplotlib (a 2D plotting library for the Python programming language.) to visualize the image.
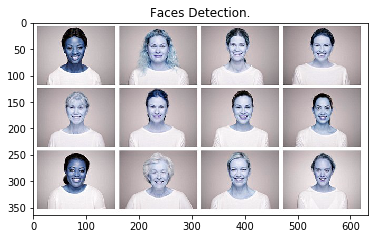
## load image using opencv
image = cv2.imread("images/faces2.jpg", 1)
gray = cv2.cvtColor(image, cv2.COLOR_BGR2GRAY)

## display image using matplotlib
plt.imshow(image),plt.title('Faces Detection.')
Step 3: Detect faces in the image using a classifier library.
At this stage, we will use the default classifier library that came with opencv to create a face cascade that will be applied on our sample image.
### cascade classifier
lib_path = "xml/haarcascade_frontalface_default.xml"
face_cascade = cv2.CascadeClassifier(lib_path)

### match the classifier with the faces image
faces = face_cascade.detectMultiScale(gray, scaleFactor=1.07, minNeighbors=5, minSize=(40,40))

### output number of faces found
print ("Found {0} faces!".format(len(faces)))
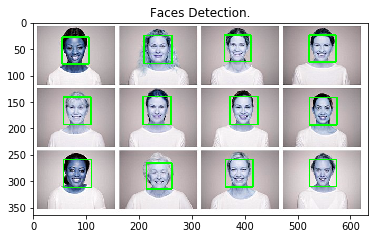
Step 4: Draw boundary around detected faces.
## draw boundary boxes unto detected faces.
for (x, y, w, h) in faces:
cv2.rectangle(image, (x, y), (x+w, y+h), (0, 255, 0), 2)

## display image using matplotlib
plt.imshow(image),plt.title('Faces Detection.')
Comments
Join the discussionNo comments yet. Be the first to comment.