


More and more GIS-enabled organizations are automating their entire GIS workflows to increase efficiency, decrease operation cost, and improve service performance. If an operational task becomes repetitive the best way forward is to automate such task if possible.
ArcGIS Enterprise is one of the leading GIS solutions that is powering the majority of organizations. This article is aimed at helping GIS administrators & developers leverage the scripting power of ArcGIS API for Python to automate the majority of their GIS workflows when working with ArcGIS Enterprise.
What is ArcGIS Enterprise?
ArcGIS Enterprise is ESRI suite of applications for mapping, visualizing, analyzing, storing, and sharing geospatial information within and outside an organization. It gives you complete control over your GIS infrastructure and can easily be deployed on your local infrastructure or in the cloud on AWS or Azure.
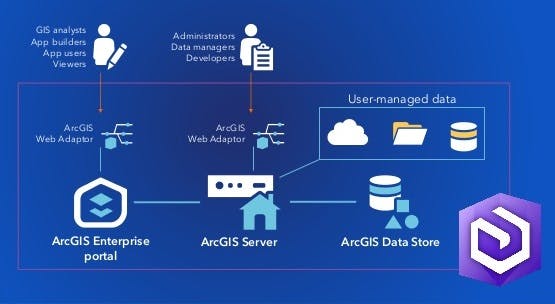
A base ArcGIS Enterprise deployment consists of a combination of three primary components - Portal for ArcGIS, ArcGIS Server, and ArcGIS Data Store. ArcGIS Online is the software-as-a-service (SaaS) version of Portal for ArcGIS in which ESRI manages deployment and other backend activities for you.
Using ArcGIS API for Python
ArcGIS API for Python is a powerful Python library for spatial analysis, mapping, and GIS. The Python library can be used by GIS professionals that are inclined with programming with Python to automate and administer major GIS activities such as publishing GIS contents, performing geospatial analysis, managing users or licenses, administering servers, etc.
Connecting to ArcGIS: working with the API requires authentication with the ArcGIS platform. You can connect to either Portal for ArcGIS or ArcGIS Online by using the web URL of the platform combined with the user's login credentials as shown below;
## portal for arcgis
from arcgis.gis import GIS
gis = GIS("[PORTAL_URL]", "[USERNAME]", "[PASSWORD]")
## arcgis online
from arcgis.gis import GIS
gis = GIS("[AGOL_URL]", "[USERNAME]", "[PASSWORD]")
1. Managing GIS Users & Groups
Users and Groups are an indispensable part of your GIS setup. As the number of users within the organization increases, a GIS administrator would see value in automating major activities related to the management of users and groups. This can be achieved using the gis.users and gis.groups modules for both users and groups respectively.
Create New User: you can add new users using the
create()method. You need admin privileges to call this method.new_user = gis.users.create( username = 'john_doe', password = '0286eb9ac01f', firstname = 'John', lastname = 'Doe', email = 'john_doe@me.com', role = 'gis_publisher', level = 2, user_type = 'creatorUT', provider = 'arcgis' )Create New Role: roles gives a user the privileges needed to perform specific actions. You can create user roles using the
roles.create()method.privileges = [ 'portal:publisher:publishFeatures', 'portal:user:createItem', 'portal:user:shareToGroup' ] new_role = gis.users.roles.create( name = 'gis_publisher', description = 'GIS Users that can publish feature layers', privileges = privileges )Update User Role: you can update or change the role assigned to a user by using the
update_rolemethod.user = gis.users.search(query='email = john_doe@me.com')[0] user.update_role(role = new_role)Create New Group: Groups are collaborative spaces in your GIS where your users share related content, you can create groups as a means for managing a collection of users.
new_group = gis.groups.create(
  title='Field Data Collectors',
  tags = 'gps, points, latlng, field',
  access = 'org',
  is_invitation_only = 'False'
)
Add Users to Group: users can be added to the created group by using the
add_users()method.group = gis.groups.search('title:Field Data Collectors')[0] group.add_users(['fieldadmin1', 'fieldadmin2'])Remove Users from Group: you can remove users from a group by using the
remove_users()method.group = gis.groups.search('title:Field Data Collectors')[0] group.remove_users(['fieldadmin1', 'fieldadmin2'])Re-assign Group Ownership: you can't remove the owner or admin of the group until you reassign the ownership to another user.
group = gis.groups.search('title:Field Data Collectors')[0]
group.reassign_to(target_owner = 'fieldadmin1')
Delete User: you can delete a user and have their items re-assigned to another user by using the
delete()method.user = gis.users.search(query='email = john_doe@me.com')[0] user.delete(reassign_to='new_user')
2. Managing GIS Contents
The ArcGIS API for Python lets you manage your GIS contents with ease using the gis.content module. Some of the common actions that you can perform on your content include publishing new content, updating and deleting existing content.
Publish Content: local data in CSV, shapefile (zipped), and File Geodatabase (zipped) formats can be published by calling the
publish()method on an item.## publish a file geodatabase gdb_file = "local/world_admin_boundary.gdb.zip" item_props = { 'title': 'World Admin Boundaries', 'tags': 'world, boundary, admin', 'type': 'File Geodatabase', 'overwrite': 'true' } item = gis.content.add(item_properties=item_props, data=gdb_file) item.publish()Search Content: you can search for items by their names or data types using the
content.search()method.result = gis.content.search( query="title: World Admin Boundaries", item_type="Feature Layer Collection" )[0] result.urlShare Content: you can share an item publicly or with a specific list of groups using the
content.share()method.item = gis.content.get("[ITEM_ID]") item.share(everyone=True, allow_members_to_edit=False)Re-assign Content: you can re-assign the ownership of a content to another using the
reassign_tomethod.item = gis.content.get("[ITEM_ID]") item.reassign_to(target_owner = 'new_user')Delete Content: you can delete content by calling the
delete()method and providing the IDitem.idof the item.item = gis.content.get("[ITEM_ID]") item.delete()
3. Managing GIS Servers
ArcGIS API for Python gives GIS administrators the ability to manage the servers that power their ArcGIS Enterprise environment as well as the web services and datastores that run on the servers.
List GIS Servers: you can get the list of all servers hosted or federated to your Enterprise by calling the
servers.list()method from thegis.adminmodule.gis_servers = gis.admin.servers.list() for server in gis_servers: print(server)List Web Services: you can get the list of services running on a specific server using the
services.list()method.server = gis_servers[0] services = server.services.list()List Data Stores: you can get information about the data stores (folders or databases) registered with a server by using the
datastores.list()method.datastores = server.datastores.list()List Machines: you can get the list of machines powering your GIS Servers using the
machines.list()method.machines = server.machines.list()List Server Licenses: you can get the license information and list of active extensions on the ArcGIS server by using the
system.licenses()method.license = server.system.licenses['edition'] extensions = server.system.licenses['features']View Server Logs: you can view ArcGIS Server logs by using the
logs.query()method.logs = server.logs.query(level='WARNING', export_type='CSV')Register New Data Store: you can add or register new data stores with your server by calling the corresponding add method such as
add_folder(),add_database(), andadd_big_data().image_datastore = server.datastores.add_folder( name='Satellite Imageries', server_path='\\image_server\latest' )Generate Servers Usage Report: for monitoring purposes, you can generate a usage report for the ArcGIS server by using the
usage.list()andusage.quick_report()methods.for report in server.usage.list(): print(report.properties['reportname']) print(report.properties['time-slices']) print(report.properties['report-data'])## total number of request in last month report = server.usage.quick_report( since="LAST_MONTH", metrics="RequestCount")
Conclusion
It's important to note that ArcGIS API for Python is different from ArcPy . While the former is designed for web GIS such as Portal for ArcGIS and ArcGIS Online, the latter is for desktop GIS applications such as ArcGIS Pro and ArcGIS Desktop.
More documentation on how to use the Python API for many other GIS related activities different from the ones shared above can be found on the official documentation website .